Showing posts with label cake. Show all posts

Butter Cake


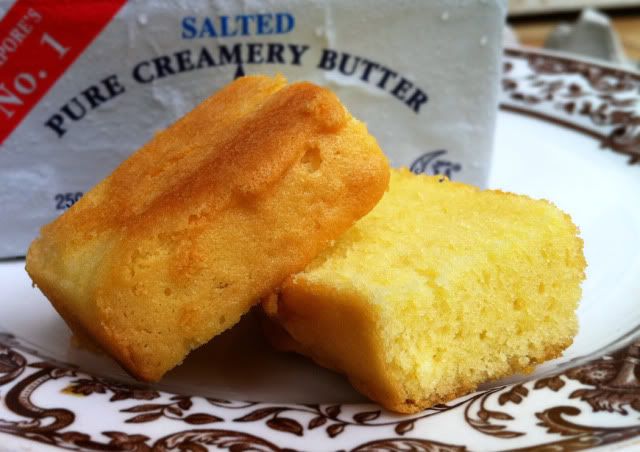
There are a thousand and one ways of using butter and you should definitely bake a cake with it because a cake infused with butter smells and tastes heavenly.

My aunt bakes wonderful butter cakes with, which she calls her little secret, her own butter cake recipe. She had actually warned me, jokingly, not to share this family recipe with others, but hey, where's the joy if its not shared and multiplied right? Haha.

The key is actually to swap a portion of self raising flour with hong kong flour and sift 3 times to achieve a soft butter cake!

Sharing the buttery joy,
Gustatory Explorer

Butter Cake
Photobucket

- 115g Self Raising Flour
- 85g Hong Kong Flour
- 200g Fine Sugar
- 8 Egg Yolks
- 6 Egg Whites
- 250g Salted Butter
- 1 tsp Cream of Tartar
- 1 tsp vanilla essence

1. Preheat oven at 200°C. Line a 20x20x7cm cake tin with baking paper and grease it.

2. Sift both the flour together 3 times and set aside. Seperate the yolks and the whites. Place the whites in a mixing bowl and the yolks into a small bowl.

3. Place the butter into another mixing bowl and start mixing at med-low speed while adding 2/3 of the sugar in spoonful by spoonful before adding in the yolks successively. Crank the mixer up a bit faster, add in 1 tsp of vanilla essence and stop once everything is incorporated. *Don't let the mixture beat for too long or else it will heat up.

4. Put the cream of tartar into the bowl of whites before starting the mixer on low, add in the remaining 1/3 of the sugar then mix on high speed till glossy and soft peaks. *I learned how to Q.C this step and that is to turn the bowl of mixed whites upside down, if it does not fall out, its done.

5. Whisk in a quarter of the whites followed by a quarter of the flour into the butter and sugar mixture. And follow through in a similar fashion till your cake batter is well incorporated.

6. Bake for 50mins at 180°C. *You may want to cover with aluminium foil first then let the top brown for the last 5-10mins. Cool, slice and serve.

Nigella's Old Fashioned Chocolate Cake & Cotton Soft Japanese Cheesecake

Photobucket

"Happy birthday bro!"

Last saturday it was my brother's birthday, my cousin's wedding day and I woke up to do something I love for someone I love. Life was at its best, don't you agree?

The idea of starting a food blog dawned on me after reading and drooling at beautiful food blogs (which were always accompanied by stunning food photographs). And so after a meticulous time of coming up with the blog name and scouring the web for a blog theme, the Gustatory Explorer was born!

Decided to dedicate my first post to my brother because I was planning to bake for him. The above 2 cakes were his birthday cakes.(: Went through several blogs, numerous recipes and discussion with my sister before finally settling on 2: Nigella's Old Fashioned Chocolate Cake & Cotton Soft Japanese Cheesecake.

My sister took on the more sophiscated cheesecake while me, being a amateur baker, baked the chocolate cake. It was our first time trying out both cakes and sadly both were not very successful.


Photobucket

Photobucket

My chocolate cake's bottom was ruined while the cheesecake's top was ruined when the aluminium foil touched the top of it and the cheesecake sank and wrinkled subsequently because I think I did a mistake of switching off the oven and leaving the oven's door ajar concurrently, causing too drastic a drop in temperature. Couldn't bring myself to take a photo of it. My sister was horrified when she saw the cake because she had asked me to watch the cakes carefully.

"Sorry sister!"

In the end she decided to frost the top of the cheesecake with my choclate frosting to make it more presentable. Tasted the cakes and thought the chocolate cake tasted a little like brownie while the cheesecake was soft and good but, unfortunately, was a little damp. At the end of the day its the thought that counts and the joy derived from baking right? As the english idiom goes, "Experience is the best teacher." Or the chinese saying, "经一事长一智。
"

Happy baking!
Gustatory Explorer


Nigella's Old Fashioned Chocolate Cake

Photobucket

(adapted from The Little Teochew who adapted from my ultimate Domestic Goddess, Nigella Lawson)
- 200g plain flour
- 200g caster sugar
- 1 teaspoon baking powder
- 1/2 teaspoon bicarbonate of soda
- 40g best-quality cocoa
- 175g soft unsalted butter
- 2 large eggs
- 2 teaspoons real vanilla extract
- 150ml sour cream (which I subbed with creme fraiche) * Note that I halved everything to make a cake just right for my family size. The other reason being, my oven is just too small to accommodate 2 cake tins. Yes, THAT small. Sad.

1. Take everything out of the fridge so that all the ingredients can come to room temperature.

2. Preheat the oven to gas mark 4/180°C and line and butter two 20cm sandwich tins with removable bases.

3. Now all you have to do is put all the cake ingredients – flour, sugar, baking powder and bicarb, cocoa, butter, eggs, vanilla and sour cream – into a food processor and process until you have a smooth, thick batter. If you want to go the long way around, just mix the flour, sugar and leavening agents in a large bowl and beat in the soft butter until you have a combined and creamy mixture.

4. Now whisk together the cocoa, sour cream, vanilla and eggs and beat this into your bowl of mixture.

5. Divide this batter, using a rubber spatula to help you scrape and spread, into the prepared tins and bake until a cake tester, or a thin skewer, comes out clean, which should be about 35 minutes, but it is wise to start checking at 25.

6. Also, it might make sense to switch the two cakes around in the oven halfway through cooking time.

7. Remove the cakes, in their tins, to a wire rack and let cool for 10 minutes before turning out of their tins. Don’t worry about any cracks as they will easily be covered by the icing later.

Recipe for Creamy Chocolate Frosting
(adapted from The Little Teochew who adapted from Allrecipes)
170 g confectioners' sugar
- 15 g unsweetened cocoa powder
- 45 g butter
- 40 ml evaporated milk
- 3 ml vanilla extract * Note that this recipe is enough for 6 servings. If you want to bake a bigger cake, you can input your desired serving size at Allrecipes (click on the link) and the corresponding measurements will be re-calculated.

1. In a medium bowl, sift together the confectioners' sugar and cocoa, and set aside.

2. In a large bowl, cream butter until smooth, then gradually beat in sugar mixture alternately with evaporated milk. Blend in vanilla. Beat until light and fluffy. If necessary, adjust consistency with more milk or sugar.

Gustatory Explorer: Note that i put digestive biscuits, which is not stated in the recipe, at the side and the top of my chocolate cake to decorate it.

Gustatory Explorer learned: Placing baking paper in the cake mould might have helped to prevent the cake's bottom from being ruined.


Cotton Soft Japanese Cheesecake

Photobucket

(adapted from The Little Teochew who adapted from Diana's Desserts)

- 140g fine granulated sugar
- 6 egg whites - 6 egg yolks
- 1/4 tsp cream of tartar
- 50g butter
- 250g cream cheese
- 100ml fresh milk
- 1 tbsp lemon juice (I omitted this)
- 60g cake flour
- 20g corn flour
- 1/4 tsp salt

1. Melt cream cheese, butter and milk over a double boiler. Cool the mixture. Fold in the flour, the cornflour, egg yolks, lemon juice and mix well.

2. Whisk egg whites with cream of tartar until foamy. Add in the sugar and whisk until soft peaks form.

3. Add the cheese mixture to the egg white mixture and fold well. Pour into a 8-inch round cake pan (lightly grease and line the bottom and sides of the pan with greaseproof baking paper or parchment paper). Wrap the base of your cake tin with aluminium foil if you are using a springform tin, to prevent seepage.

4. Bake cheesecake in a water bath for 1 hour 10 minutes or until set and golden brown at 160 degree celsius.

Gustatory Explorer: There are fantastic tips over at The Little Teochew. So be sure to head over there to check them over before attempting this recipe, it would really help!